


I've taken thousands upon thousands of pictures of my children in the past almost-six years with many digital cameras (little point and shoots and a digital SLR), and I just wish I'd had this list when I started out. While I might not have taken fewer pictures, I sure would've gotten a lot more good ones--no matter the camera I used. Thanks to a ton of trial and error and dedicated practice with a few great digital photography books, here are the seven secrets that have turned my pictures from snapshots to photographs:
1. Mind the light: This one comes first because, honestly, if you don't have good light the picture may hardly be worth taking. Seriously. If the sun is directly overhead you'll get harsh shadows, if it's shining right in their eyes they'll be squinting and overexposed, and if it's behind your kid he or she will turn into a dark backlit shadow. Aim for sideways light (early-morning or late-afternoon), the diffuse quality of bright but overcast days or, if you're inside, bright light from a window (like this picture of someone trying to lick the glaze off my monkey bread).

2. Use your flash...the right way: Speaking of being inside, it's rare that you can get enough natural light to take a great picture. This is where your flash comes in. The best choice is an external flash which you can point toward the ceiling to take advantage of softly reflected light or hold off to the side to get that nice sideways light (and avoid that overexposed deer-in-the-headlights look). Alternately, you can buy a diffuser for the flash on your camera to soften it. Also, look at the settings on your flash. You can often dial down the intensity of your flash or opt for 'Slow Flash' which puts the light later in the exposure.
3. Read your manual: What? You didn't know that you could do a slow flash or make a lower-intensity flash? I'm guessing that you haven't read the manual. Admittedly, I almost never read manuals, and I didn't read my camera manual for years. I didn't know about all kinds of little features, like dialing down exposure, fancy flash tricks, or really how to use the non-automatic settings on my camera. How embarrassing!
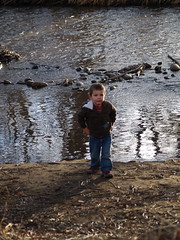
4. Get in close: So, you're at the Grand Canyon. The rocks are beautiful, the vistas are sweeping. You want to capture it all, so you have someone stand in the middle of the frame and get it all in. What do you wind up with? You get a tiny person distracting from the big view (see that little tiny guy in the picture above?. How about taking a picture filling the frame with the child's face, capturing the color and pattern of the Canyon behind them? You'll get more detail and interest in their face, as well as a sense of where they are. Take another picture of the big view and enjoy that, too.
5. Don't put your subject in the middle: Okay, so you're still at the Grand Canyon. You really do want a picture of the Canyon with your child. Rather than having them as a lone figure completely framed by scenery, compose the shot with them off to the side, getting in close enough to see who they are then get the big view behind them. When you center your subject (or put the horizon line straight across the middle of your shot) the composition feels very static. By leaving some space you leave room to look around them and the sense that something is happening.

6. Don't ask for a smile/try to catch them when they're not looking: Look at the wonky face in that photo--do I even have to explain this one? Seriously, when you ask a child to smile you get anything from a nice, prim smile that feels formulaic to the kid who doesn't know how to smile and squishes their face up into a Joker-face. Not pretty. Instead, aim to catch them in the act, at that moment when they look up happy and laughing. As a last resort (like for posed family photos), tell them to say 'cheese.' I know it sounds cliched, but it really works.

7. Dress them in bright colors: Large areas of white and light pastels often lead your camera to underexpose the other areas of your photo, making everything else look a shade too dark, while black leads to overexposure and your subject will look a bit pale. Bright colors are also more complimentary to a child's complexion, making them look flushed and happy...and isn't that what you're trying to capture?
Admittedly, I'm not a great photographer, but keeping these tips in mind has improved my photographs tenfold. What do you do to take better pictures?